WEEK 1
Nuke Overview
In the first week we looked at the interface of Nuke and learned some basic shortcuts such as F and H keys which scale up and frame the composition. We then created a basic animation.
Fisrt, we set the frames per second to 25 and the format to HD_1080 at Project Settings (S on the keyboard). After creating a ColorWheel, we added a grade node, a blur node, a transform node and we played around with keyframes.
In order to keep the script neat, we pressed command key to bring up a dot. We can also press "." to bring up a dot we can connect to the relevant part.


Project Directory
Before starting to work on projects, we first need to set up the project directory in the project settings. We select the folder where the assets are. Then, file->insert node comp to insert the comp script while looking at the project directory. We can see the files because the first part in the project directory where it shows the file location (in read notes) was deleted. Otherwise,if we work on different machines, it will not be recognized the fact that this first part, the file location, is depending on that specific machine.


Primary Colors
Nuke works with red, green, blue color channels to form an image. We can hit 'a' to turn on/off the alpha channel.
When we look at an image and move the cursor around it we can see the red, green, and blue values
We work with DPX sequences because they contain much more color information.
The Merge Node
The merge node combines the foreground(A) with the background(B). With shift+X we can change pipe A with B or pipe B with A.
We worked on 3 different examples.
On the last exercise, the layers were out of order so we arranged them first.
Finally, we added a write node(W), selected the folder in which we want to export the comp, named the comp, and added ".mov", changed the format, clicked "render".


WEEK 2
This week we explored more rotoscoping and how to animate roto over time, using different nodes such as Roto, Copy, Premult, Grade, Blur, etc
When importing image sequences, we need to make sure that we adjust the format to the correct size. On Project Settings (S), we need to change Full-Size Format to the one corresponding to the footage.
Save comp
File-> Save Comp
We navigate to our folder and within 'Data' we create a new folder and call it 'SCRPTS'. We make sure we add the major save (01) and the minor save(V001)


The basics of Roto
A good start is to analyze the footage, in order to see if there is motion blur for example or any issues. Then, we need to find the frame where there is no motion blur and it is the sharpest part.
We bring in the copy node (K), connect B to the image and A to the Roto(O).
Using B-Spline, we selected the shape (trying to select the sharpest edge).
We can press M to activate mask Overlay and Q to show/hide control points of the mask.

We can also feather the edges: Roto->Feather and add a Blur Node (connect it to the roto shape and adjust the size)
To cut the Roto out, we bring in the Premult node


In order to change the background, I added a Constant Image and Merge node.

Animating Roto over time
For the next exercise, I used mostly the same techniques.
This time, I used Cusped Bezier. To animate it, I changed the position of the rotoscope and Nuke was setting keyframes.
Ctrl/Command + <> -> go to the middle of 2 keyframes
Alt + <> -> go to the previous/ next keyframe
I also added a grade node and connected its mask to the blur node( so it will not affect the whole image) to change the color of the building and I animated the color.


WEEK 3
Complex Roto
In week 3, we continued looking at how to roto, but this time we roto more complex objects. We learned how to break down an object into multiple shapes, organize the shapes and animate rotos.
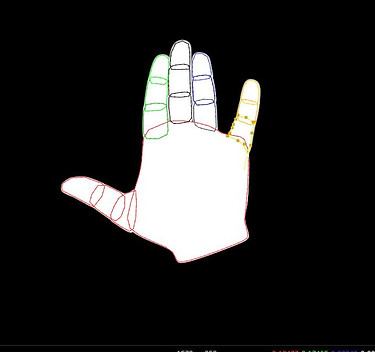
For the first exercise, we had to roto out a hand.
I used the Bezier roto tool and B Spline.
First, I broke down every finger into three shapes, and then I selected the rest of the hand. I chose "the hero frame" and animated the shapes across time by setting up keyframes. I went to the roto settings and then feathered up the shapes.

I created different folders for every finger to keep my work clean and organized.
"+" -> to create a folder
Clicking on the first square we can change the color for our shapes
Also, we can turn motion blur on



WEEK 4
Basic Keying
This week we looked at some basic keying techniques and learned about Garbage Mattes, Luma key, Chroma Key.
Garbage Mask
The garbage mask is used to remove unwanted objects such as people, lighting or rigs from the foreground. We need to connect the mask from the OutM to Keylight.
Luma Key
By using Luma Key, we remove parts of an image using brightness as a method of selection.
In the first exercise, we had to replace a sky with another one. We used the luminance values from the first sky and keyed that out based on luminance. Then, we used the second sky as a replacement


We added a keyer node. In Keyer properties, we played around with the handles of "range" by dragging the yellow lines. We switched the view to alpha and adjusted the lines so that the sky was black (as much as possible in order not to distort the image).

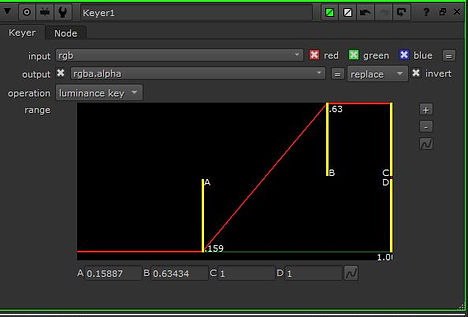
We added the copy node which carries all the channels (connected A to keyer, B to the image), and the merge node ( A to copy, B to the new sky). Then, we added another merge node between keyer and copy and connected pipe A from Merge to a Roto node (created a shape across the scene)

To get rid of the white surface in the right corner, we used another merge and roto node, but this time we changed the operation of merge to stencil. Finally, we added a Premult node to cut the sky out.


To make the final image look more realistic, we added a blur node that softens the edges and a Colour dilation node. The lightwrap node takes the colour from the background image and integrates it more with the foreground


Task: same techniques on 2 different images
Images that I used:


Final image:


Chroma Keying
In the second part of the lesson, we learned how to key out the green screen.


First, we added a keylight and connected the source with the green screen image.
Pick up the green: Ctrl+Shift+drag
Hide the colour picker:Ctrl+Shif+L+click on the image.

Added a copy node (A to keylight, B to the green screen image). We made another keylight and for that, we first added a merge node (pipe A from copy to merge, pipe B from merge to the first keylight and A from merge to green screen image).
We, then, made another key that we called ''garbage key'', which creates a much more solid matte and transparent background.
We merged the 2 keyframes and changed the operation to mask.

Under the garbage key, we added a filter erode that is gonna expand the withe matte. Negative values cause brighter areas to expand into darker areas and positive values cause darker areas to expand into lighter areas. We played around with the filter dropdown to control the erode computation speed (box) versus quality (gaussian)

We brought in another merge and roto to stencil out the areas that we do not need.
Finally, we added another merge node between the background and copy node and a premult node under copy. Then, we connected pipe A from merge to premult and B to the background.
To remove the greenscreen reflections, we used the despill node under the copy node


WEEK 5
Advanced Keying
This week we continued working on the green screen footage from last week. We added an additive key that brings back the hair details that we lost when keying.It takes the dark and light values from both the background and the foreground. We connected the blur into the filter erode, the foreground/background into the foreground/background of additive key.


In the next exercise, we learnt how to key out multiple shades of green.

In order to get rid of the noise, we bring in the denoise node.

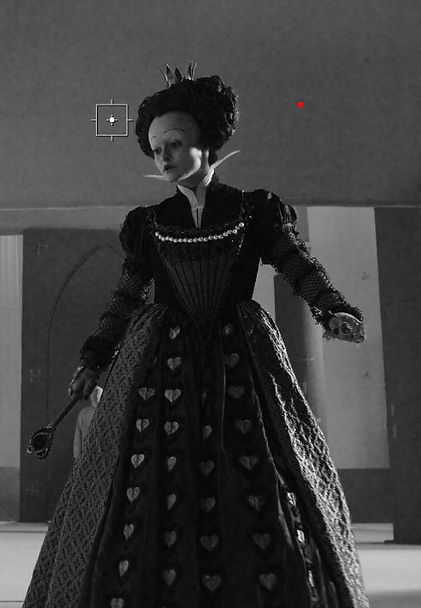
Following the steps we did last week, I added keylights to highlight different parts of the greenscreen (played around with clip black/white), keymix and then, I roted out different areas like the sides of the head, the forearms, etc. In order to completely remove the background, I added a garbage matte. Finally, I added a premult node to the node tree to cut out the lady and a despill node to remove green reflections.


Task- Additional Advanced Keying Exercise
In this exercise I removed the lady from green screen. The woman sways her hair back and forth, so I used a garbage key and filter erode node. In order to get rid entirely of the green, I also used a roto node for her hand.

WEEK 6
Tracing in Nuke
This week we looked at how to trace in nuke by using 3 different ways.
I imported a video showing children playing musical instruments, and I removed the white sign. I added a rotopaint node to remove the line of the text.


Method 1
1. we bring in the tracker node
2. click on ''add track''. The pattern in the inner box is what we want to track, the outer box is searching for the pattern in our scene. Then, we click on ''track to end'' (the play button)
3.we can track from the middle (click on ''clear_fwd'' and adjust the box)
4.jump on the hero frame and change at tracker node change the transform to match-move 1-pt


Final Result

Method 2
I used a previously used video of a city flyover. I tracked the small air ventilation system by using a tracker and a roto node.

Method 3
I used the last frame as our hero frame and roto the window of the car. Then, I clicked on planar track this shape backward (right click on roto)
I created the corner pin 2D shape(absolute, baked)

On corner pin -> From ->Copy to (at last frame)
Right click-> No animation
I create a roto shape and grade through the mask. Then, I connect the corner pin between roto and the video and adjust the roto.


WEEK 7
Josh Parks Masterclass
Reference:

My process and part of the script that I screenshoted in class.


Final result:

WEEK 8
Colour and Grading
This week we learned about colour and grading.
Colour Correction -> matching elements to the plate
-> compensating for poor lightning
Process: Match Luma (Lightness) + Match Tones
Grading -> emulating a film stock
->aesthetic
->storytelling
In the first exercise, we learned how to grade in order to match the screen, starting from the comp below:
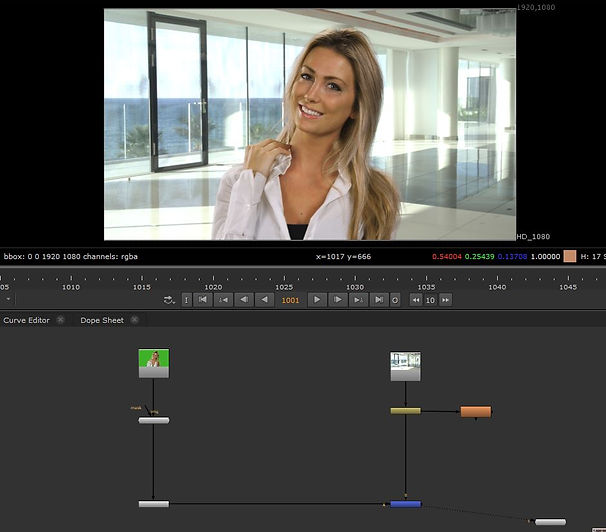


Note (for grade node):
lift-> affects the black areas
multiply ->affects the bright and white areas
gamma->affects both
-adjust the lift,multiply, gain and gamma

2. Work on the colour:
-add another grade node and call it colour
-on multiply, press CTRL on the colour wheel and adjust the colours
With images, when we are moving the gain up and down we can see at what point the images have been exposed.
Steps for grading:
1.Work on the brightness -> Luma:
-add a grade node and call it LUMA
- hit Y to check the luminance; examine the black areas in the background and black areas on the subject

-add a saturation node (in our case turn the saturation a bit down)
- work on highlights (the ones from the window in our case): ->add a grade node and connect its mask to a roto node; after creating the shape, increase the multiply at the grade node


Before and After:


In the next exercise, we learned how to animate the grade across the scene. In our footage we can see a patch on the floor and it gets darker within the scene


We added a grade node, picked the darkest frame and "'set key'' on multiply(Grade node). We set different keys and adjusted the slider of multiply in order to match the scene with the patch.

Grading using the luminance of an image:
We bring in the keyer node and adjust the slider to bring out the brightest parts of our scene

We add a grade node and connect its mask to the keyer. Then, we adjust the multiply

Grading through mattes:
We use a roto node and connect the mask of the grade to the roto.

Another exercise for color grading:


WEEK 9
Cleanup and patch
As compositors, we need to dial in the colour values, match the black, etc until the shots blend together.
Grain(noise) represents the noisy disruption that appears when acquiring images.
The amount of grain changes within a film/digital plate depending on the luminosity of the scene. Brighter areas will have less grain than darker areas.
Note: the blue channel often has the most grain
We looked into rotopaint node (P) and played around with rotopaint brush attributes such as opacity, size, hardness.

We can sample an area using Clone Tool by holding down command/CTRL. The first circle is sampling and the second one is creating a clone of that sampled area.


We can also use the Reveal Tool to reveal what we want to bring in.


Clean Up Trackers
We bring in the tracker node, add 2 trackers and hit play.

We bring in the rotopaint node and we paint on clone 1 and 2. In rotopaint tab -> Lifetime, we change lifetime type to all frames


We select tracker 1, then change the transform to match-move and set to current frame(1201). In our tracker we select the translate x and y , hold down command/ctrl and drag it to the top translate x and y (in rotopaint). We do the same with center x and y. This way the information that we just put in is linked. It's taking the transform information from tracker and applying it into the rotopaint.
FINAL RESULT:
Clean Up Static Path
In this exercise, we remove the old man walking. We create a static patch over the old man and freeze the frame where he is out of the scene.
We use frame 1100 as our hero frame. Because it is a slight movement in the scene, we add a tracker node and track one of the stairs.


Then, we use FrameHold node in order to freeze frame. We create a Roto patch for the area in which the old man was. We bring in the copy node to bring in the RGB values through the pipe and then a roto node. We add a blur node to soften the edges.

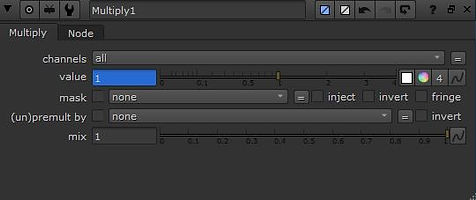
We add a Premult node to cut out the patch and a merge node (B pipe to the original plate and A pipe to Premult). However, the women have half of their bodies disappearing. So, we bring in a Multiply node after the tracker. We set the value key frame to 1 just before the women walk in through the patch and set the key frame to 0 when they start walking through in.

Clean Up and ReGrain
When the scene is zoomed in, we can observe some grain.
First, we need to get rid of the grain, so we add the Denoise node and a Grain node.
We bring in the wipe control (W) that makes the viewer display a split-screen of 2 images (original and grain).
We need to control the SIZE (shrinks or enlarges the grain granules), IRREGULARITY(increases or decreases the random quality of the grain), INTENSITY (increases or decreases the contrast of the grain) in order to match the grain value with original RGB background image.

R


G


B


Final Result:

WEEK 10
Complex Cleanup
In the first exercise, we learned how to cleanup the crowd within the shot.
We need to create a planar tracker to track a particular area, so we bring in a roto node and draw a shape on the ground floor. We select the shape, right click and ->planar-track the shape forward. Now we have an area that stays the same across the scene. Then, we select CornerPin2D relative, baked because we created a patch which is next to where we tracked.


We create a FrameHold at frame 1001(hero frame) and bring in a copy node. Then, we draw a roto shape and select the people. We bring in a RotoPaint and start cloning the pebble. We add blur on the roto, so the edges are not so harsh.

We bring in a merge node and we add the CornerPin2D node, so that patch sits well into the scene and follows the camera movement.

Improve our composition:
-add a grade node and play around with multiply(use mask) to darken the area a little bit more; bring in a roto and draw a slightly smaller shape, then feather the edges


Final result:
Clean up complex moving
In the next exercise, we have to remove the boat and replace it with moving water
As before, at frame 1001(hreo frame) we draw our planar track in the area which is going to be still, without any moving elements. We choose CornerPin2d relative, baked because the area we selected is relative to the moving water.
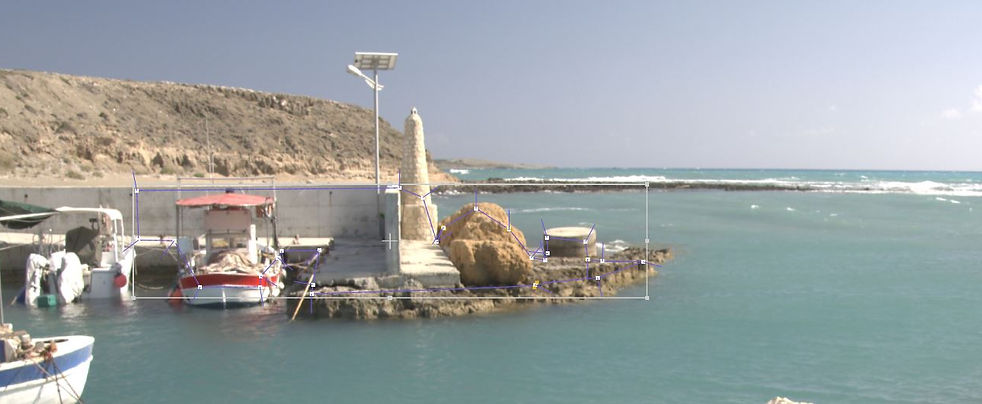
We bring in a copy node and a roto. We draw a roto shape patch. We are going to create more shapes that can cover the boat.
We cut out the shape (using premult node), while retaining the RGB values and alpha from the roto(so premult node under copy node). We soften the edges with blur node. After that, we bring in the transform node so we will be able to manipulate where that patch is.
We move the patch(put the transform handle on the center of roto shape by cmd/ctrl+ dragging) in order to cover the boat. To build more patches, we need to copy and paste all nodes and then draw another roto shape, bring another transform node and merge with previous merge node.


WEEK 11
Nuke Recap Skills
Applying patch and changing logo
We need to create a planar tracker, so we bring in a roto node and draw a shape on box. We select the shape, right click and ->planar-track the shape forward. Then, we select CornerPin2D relative, baked.


We create a FrameHold at frame 1001(hero frame).We bring in a RotoPaint and start cloning the text.Then, w e bring in a copy node and a roto. We draw a roto shape on text. We add blur on the roto, so the edges are not so harsh. Then, premult to cut it out.We bring in a merge node and we add the CornerPin2D node.

We go to CornerPin2D node, 'from'->'copy to' and then we select the box and set 'no animation'.

In order to add the new logo, we bring in the image with the logo and merge it with our composition. We add a reformat node(change the output format to the correct size), CornerPin2D, Transform (adjust the scale and position).
We need to make the logo and the composition blend together, so we add a grade node that we call ''luma'' and play around with gamma and multiply.

We change the saturation of the logo and we can also add defocus node.

FINAL

Keying and tracking marker

We add keylight node and connect the source to the main image. We select the green, then adjust the clip black and clip white.

Then, we add another keylight, adjust again the clip black and white and a filter erode node. We merge the 2 keylight nodes(operation:mask)

We add trackers on some of the yellow signs and we clone them. We bring in despill node in order to remove the green reflections. We can add a grade node(and play around with lift, multiply, gamma) and a saturation node.

FINAL

Assignment 1
For this assignment, I was provided with a green screen video. For the first part of the assignment, I have to remove the tracking markers, remove the logo on the bag, change the colour of the green screen background and put a picture on the tv.
Removing the tracking markers
I choose frame (where all trackers are visible) 1081 as hero frame and I added framehold node. Then, I added a roto paint node between the original footage and framehold and I used clone tool to remove the markers. I brought in the copy node (A pipe connected to roto and B to framehold). I made roto shapes for markers and I connected the copy node to a premult node.
However, the original roto was affecting the man so I added a roto around his head and top part of the body and I animated it as he moved. I merged them using stencil.


Removing the logo from the bag
I brought in a roto node and I drew a shape around the logo. I selected the shape and I clicked on planar track this shape forward. I chose cornerpin2D relative, baked. Then, I disconnected the roto node from the video and added a RotoPaint node and set it to frame 1020. I remove the logo using clone tool. I brought in a roto node and connected to a copy node. To remove the rest of the video, I added a premult node. Finally, I connected the corner pin node.
However, I needed to adjust the color grading because the bag got lighter and darker as he was moving, but the patch remained the same. In order to solve this, I added multiple grade nodes and animated throughout the video.


Removing the green screen
-removing the grain: Denoise node
I added 2 keylight nodes: one to remove the whole background and the other one to preserve more detail in the hair. For the second one, I used a filter erode node. I merged them with keymix. Then, I added a copy node and premult node that I merged it

Problems that I fixed:
-some green was still showing: I added a Despil Madness node between premult and copy
-the shadow under the bag was black and grey: I added another keylight and I merged it with keymix. I animated the roto of the shadow as he moved
-the logo on the T-shirt was blue/purple-ish: I added a roto node and merge it using over
-the TV was a bit blue: I added a roto and merged it using plus

Adding an image to the TV:
I added colorbars node and I used reformat, cornerpin2d and transform to adjust the scale and position. I merged it and set it to plus.
However, when he walked past it, the image would go over him so I used the same roto from when I removed the markers and merged it.

Final Video:
Part 2
For the second part, I used a background that shows a prison. On the TV, I added a CCTV footage and defocused it. I downloaded a police officer on green screen from youtube and I merged it into the scene. I had to create a luma to adjust the multiply and lift (I did this by viewing the luminance and match the levels of white and black of the main image to the cop) and multiple grade nodes. I had to adjust the color of his skin in order to match the composite.
I removed the red screen using rotopaint and choosing a hero frame(1100). I then added acopy and a premult node.
Then, I color graded what was in the original video and I also played around with saturation, gamma and gain of a grade node for the background.


Final Video: