top of page
WEEK 1
Intro to Unity
This week we downloaded the personal free version of Unity. By signing-up, we can use the Unity Asset Store and download free assets and plugins. To access it,we can go to https://assetstore.unity.com . We downloaded, imported the LoPoly Environment Pack and played around with it.
For any packs we go to ‘Open in Unity’ and in Unity to ‘Import’.

Note: Shortcuts are same as Maya for Move, Rotate, Orbit etc. Objects highlight in Blue when selected
Hierarchy: illustrates models, lights and camera’s
Scene: allows you to orbit and manipulate objects.

Camera’s:
With the camera selected, we can check the Inspector
Inspector: displays settings and properties related to our elements.
Player Camera setup
We can add a First Person Camera to our scene in order to have player navigation.
-> Standard Assets from the Asset Store
->Characters -> First Person Character -> Prefab -> FPSController
In order to use FPSController, we went to: https://github.com/johnathanhales/UnityStandardAssetFixes. and put the files into the Standard Assets -> Utility inside our project folder.
We also need to delete the previous camera.


Prefabs and populating scenes
I used FBX and Prefabs folder to play around and create a scene.


WEEK 2
Maya Scene Organisation and Display
Maya Sculpting and Displacement
This week we explored scene organisation techniques such as grouping, instancing and display layers to layout and organise assets in Maya. We have also studied Modeling, Sculpting and Displacement in Maya.
I used the original assets, I used in week 1 in Unity.
Camera Clip Plane
'Persp' Camera -> Camera Attributes -> Near and Far Clip Plane =3000000 in order to stop the objects clipping at distamce from camera.
In this window we can also modify the Angle of View, Focal Lenght and the camera scale.
We put 'leaves' and 'tree_1' into a group (Ctrl+g) and we name it 'Tree1'. 'tree_1 mesh' and the 'leaves locator' became in this way, children of 'Tree1'.
We moved the pivot to the tree trunk (D on the keyboard)

Isolate Select allows us to isolate the view to just the selected object.
Ctrl +/ Show -> Isolate Select ->View Selected
Instances
Edit -> Duplicate Special -> Geometry Type= Instance
Translate X= 200 ( this means 200 units apart)
Number of copies= 5 (5 new objects)


Hide Selection
To hide an object: Display -> Hide -> Hide Selection / Ctrl + H
To make an object reappear in the Viewport: Display -> Show -> Show Selection / Shift + H
Display Layers
We put together plant 1, plant 2,..., plant 6 and plant 7
Channel Box -> Display tab -> Layers -> Create Layer from Selected
The new layer will be found in the right side display window.
V ->makes the object visible or invisible,
T -> template,
R -> reference. R makes the object visible but unselectable. These attributes will be applied to every object in the selection group or per-object.
Poly Count and Poly Display
Display -> Heads up Display -> Poly Count : It shows scene info

Display -> Polygons -> Vertex Normals: to validate how the model is shaded in the viewport. We can soften the edge by pressing F2
Mesh Display -> Soften Edge : to smooth
The Mounting_1 is made of 2903 Tris. When we press 2 on the keyboard (to smooth) Tris became 71552.
We can go back to the original shape by pressing 1 on the keyboard.
Mesh -> Smooth -> Division Levels= 2 : the smooth has been applied permanently.


Soft Selection Modelling
Tool Settings -> Soft Selection (on) -> Falloff Radius= 470 : to sculpt
Using the soft selection I created some rolling hills.
The colors on the selection : yellow and red -> shows the part which is more affected by the changes I made in the selection
black -> shows the less affected part from the selection

Sculpting Tools
I created a plane and set the subdivisions width and height to 200. Then, I double clicked on the sculpt tool on the shelf. I played around with some sculpting tools such as the Grab and the Smooth Tool.
To change the size of the brush we can press B the keyboard and to change the strength we can use M.


I have used the images below to sculpt shapes using the sculpt tools in Maya.


WEEK 3
Environment Modeling and Texturing
Environment - Level of Detail
Real-world reference such as photography can play a vital role in asset creation for environments (modelling, texturing and lighting work). A striking example is represented by Jungle Book, many photo shoots were realised in India. They started with concepts, built a library and then it was the layout phase.The new scenes were sent to animation and lighting department.
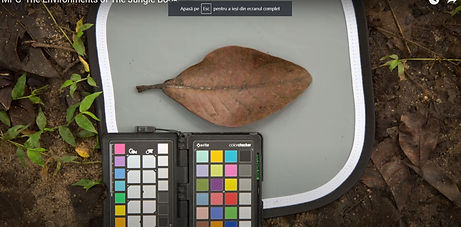

Environment – Level of detail (LOD)
In Star Wars Battlefront was used Photogrammetry(using photos for measurements, modelling and texturing)
The process:
-take a series of pictures
-align the pictures in a photogrammetry software such as Agisoft
-generate a point cloud and then a high density mesh
-finally, generate the textures/models


Environment – Displacement detail
Displacement maps are used to add detail in environment and to create roughness.
Maya's Content Browser has images which can be used as displacement sculpt stamps:
Windows -> General Editors -> Content Browser
However, stamp images which can be used with Maya, Zbrush and Mudbox are also on Textures.com
There can also be found textures derived from 3D scan data (maps for displacement, alpha and colour)


Maya – Alpha channel textures – Leaves
Alpha channel is used to create transparency in 3D.
Using alpha channel, I made a plant.
I created a plan, then I assigned a New Material -> Lambert and loaded a file texture(Leaf_Alpha.tif)
to display the model as shaded with the texture shown in viewport: 6 on the keyboard.
Note: We can switch between Wireframe (4) Shaded (5) Textured (6) and Lit (7) display modes.


I switched to Photoshop, opened Leaf_Alpha.psd
In order to make an alpha channel for transparencyThe file has an Alpha channel for the transparency we see in Maya. In order to create this I used Selection Tools and then Save Selection as Channel Button. Note: Export files as .tif or .tga from Pshop to retain the Alpha.
Back to Maya, I moved the Pivot to the stem of the leaf (W and then D).
I created a thin Cylinder then duplicated (Ctrl+D) the leaf models and used the Rotate (E), Move (W) and Scale (R) tools to make the plant.
Rendering
Render Menu ->Viewport 2.0[] ->Transparency Algorithm: deepth Peeling/Alpha Cut
Lighting Menu -> Two Sided Lighting (on)


Alpha Channel Textures
Library of free textures which include alpha channel for transparency: https://www.textures.com/browse/leaves/1763
https://www.textures.com/browse/branches/105491
Using the textures below I created a tree:


The lowpoly tree I modelled:


WEEK 4
Lighting
This week we explored lighting for realtime and offline rendering. We used Maya's Arnold Renderer, Viewport 2.0 and the Unity Game Engine.
Depth map and raytraced shadows
The outcome of depth map shadows or ray traced shadows is almost the same. However, depth map shadows take less time to render.

Maya Light Types
I imported a .STL file into Maya and played around with the lights.
I made sure that the stlTranslator.mll plugin is loaded.
Create -> Lights: to add light to the scene
Note: Lights under this menu are not the same as the lights from Arnold lights.
I created a new Arnold Area light and scale it to size covering most of the imported mode. Then, I played around with Exposure(to increase the light) and Spread( to have sharp cuttoff around the edges) from attributes.
The default Image Size for Arnold renders is HD_540, this can be turned up from the Render settings
Light blocker
Having the light selected: Attribute Editor -> Light Filters-> aiLightBlocker
To modifi effect : density


Realtime Lighting – Spotlights
The Cone Angle, Penumbra Angle and Dropoff settings adjust the spread and range of the light.
How to check if the light has Depth Map or Raytrace Shadows turned on?
Shadows -> Depth Map Shadow Attributes or Raytrace Shadow Attributes.
Realtime Rendering – VP2.0 AA / AO
Render-> Viewport-> [ ] -> Screen Space Ambient Occlusion (AO) : adds shadow detail to occluded areas
-> Anti- Aliasing (AA): smooths edges


Unity Realtime lightings
We played around with lighting settings, using a scene that has some lighting setup along with animation.
Hierarchy view -> Directional light: -mimics sunlight (rays are parallel))

Rotating the light to be parallel to the ground plane creates dusk light and rotating it to point downwards creates mid-day light


Hierarcy ->Spotlight
Spotlight settings are similar to Maya. Spot Angle is similar to Core Angle.
We can edit the intensity and strength of shadows to modify effect.
Spotlight is used as the key light in the scene with the Directional Light providing ambient effect.
WEEK 5

Maya organic modelling, UV unwrapping and Zbrush detailing
This week we created a tree in Maya and added details in Zbrush. In order to unwrap the model we cut it into more UV shells and then we used the Cut Tool(in the UV editor)


We exported the model to OBJ format (Windows -> Settings/Preferences->Plug-in Manager) and imported in Zbrush. Then we need to subdivide it.
Alpha Brushes: https://pixologic.com/zbrush/downloadcenter/alpha/#prettyPhoto['9']/170/
Import a brush, then Alpha->Make St. Making Stencil from the imported alpha stamp. Turn Stencil on and draw.
Note: to bring up the gizmo and move/rotate stencil around, press sbacebar
We created a normal map, pressed clone NM,Flip Vertically and then we exported it as a Tif file.
Back to Maya, we assigned blinn texture and at Bump Mapping we imported the Tif file.


WEEK 6
Procedural Environments(Maya/Unity)
Material Setup (Maya/Unity -Normal/Displacement
Megascans assets
We imported a FBX asset from Quixel Megascans into Maya and created a Phong material.
In Hypershade-> Phong 1SG -> Displacement Map -> choose file1 node ->load the displacement map file
Hypershade -> Phong 1->Color -> load Albeddo map
To assign the material to the model: select the mesh -> right click over phong1 material -> Assign Material to Viewport Selection
To view Displacement Map in viewport -> Attribute Editor -> Smooth Mesh -> Enable smooth mesh preview and displacement preview


For the next exercise, we exported the leaf asset we worked with in week 3 via FBX. We imported it into Unity


Next, we worked with a scene setup that uses megascans assets and we checked some settings:
Shader Type: HDRP/Lit Tessellation
Displacement Mode= Tessellation Displacement
Inspector-> Parametrization=Amplitude ->play around with the amplitude value


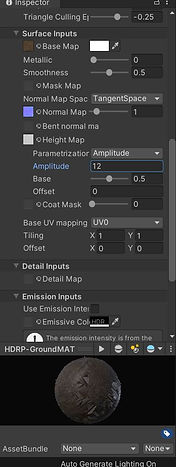
Assignment 1 - Focal Areas
For the first assignment, we had to choose one or more areas that we explored this semester.
The focal areas that we covered are: Environment layout(Maya/Unity), Environment modelling and texturing(Maya Pshop), Realtime and Pre-rendered Lighting(Arnold/Unity), Cresture modelling and detailing (Maya/Zbrush), Procedural Environments, Texture Detailing.
My idea was to show the skills I gained by exploring Environment modelling and texturing (Maya and Photoshop), Realtime Lighting (Arnold), Procedural environments(PaintFX)


WEEK 8
This week, we had an introduction on Substance Painter
The substance launcher has a tab for 3D models which can be loaded in Substance

I used a skull model to explore the textures and alpha stamps.
We can switch between 3D/2D views from the bottom at the top right.

I selected the Texture Set Settings and clicked the Bake Mesh Maps button.
Baking -> Output Size=2048, and then I clicked 'Bake default/Mat Mesh Maps' (in order to work with procedural material generator)


I added Iron Raw Damaged material into the model and a red fill layer. Then, I right-clicked on the fill layer and added a white mask. On the layer mask, I added a generator.


I inverted the mask and added new layers with different base colors (I turned down the height value).
Note: make sure that color and height are turned on for the material.
I applied alpha stamps. The brush size can be modified by holding CTRL+ Right Mouse Button and dragging and rotated by holding CTRL+Left Mouse Button and dragging up/down.
Once I finished, I changed around the settings in the environment settings which adds a background.


WEEK 9
Substance > Maya
This week, we worked with Jade Toad substance example:
File -> Open Sample
File -> Export settings..-> Arnold 5
File ->Export Mesh. Save as type Wavefront OBJ.
Then, we imported the file into Maya.


In Hypershade, we created an Arnold Shader (aiStandarSurface).
In order to set textures for each of the different slots, I clicked the slots beside the name to load file texture for each of them (Base ->Color, Metalness; Specular ->Roughness; Geometry->Bump Maping)

Bump2d node: 2d Bump Attributes - Use as: Tangent Space Normals.Then, we loaded the correct texture file for the file nodes.
Note: for each of the textures files, we need to set the Color Space to Raw and turn on Alpha is Luminance


We created a SkyDome in the scene and added a HDR file

WEEK 10
Substance > Unity
This week we learnt about Substance-Unity Export Settings.
File-> Export Textures
We added an Ambient Occlusion map for export, we named it as "$mesh_$textureset_AO" .
Note: we need to select Gray channel.
After we click export, we can find the files in:
User/Documents/Allegorithmic/Substance Painter/Export
To export the mesh: File -> Export Mesh
We need to save it as Wavefront OBJ format

Then, we went to Unity to create a new project (3D With Extras)
Import Textures: right-click in the Project->Assets window and choose Import New Asset


Import Mesh:
Right-click in the Project>Assets folder and choose Import New Asset. Browse to the .obj mesh file
Then, we can drag the model into the Scene viewport.
Right-click in the Project->Assets folder and Create->Material. Then, drag the material from the assets folder onto the skull in the scene.
Note: click on the lock icon to lock the display in order to make it easier to drag the textures into the material slots.


Assign textures to Material:
Drag each of the textures onto the correct slot in the Inspector for the Material
Albedo= defaultMat_Base_Color
Normal Map=defaultMat_Normal_OpenGL
Mettalic=defaultMat_Mettalic
Occlusion=defaultMat_Mixed_AO
To make sure the Normal Map is correctly identified we need to click the Fix Now button under the Normal Map section.
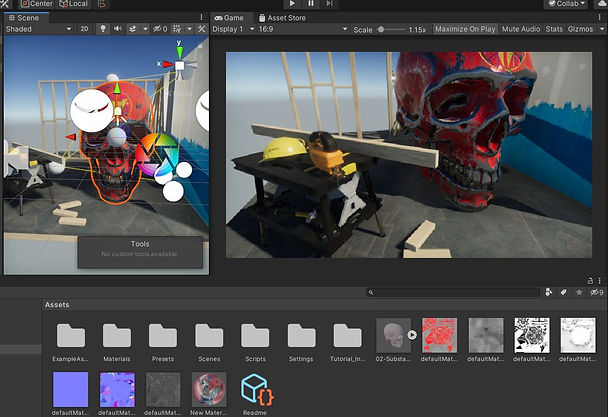
We added an environment map.
From the Inspector, we went to the texture we imported and changed the Texture Shape to Cube and Mapping to Latitude-Longitude Layout (Cylindrical)
Then, we created the material and changed the Shader to Skybox/Cubemap
Window->Rendering->Lighting Settings and we dragged the new material onto the skybox material in the lighting settings.


WEEK 11
Surface Modelling- NURBS
What is NURBS Modeling?
Nurbs are useful for very smooth objects or when we need an exact surface.
A NURBS object has always 4 sides and it is made of curves which are defined by control points.
In order to create complex objects using NURBS, we have to create many individual NURBS objects, called 'Patches'.
NURBS are often used in engineering and product design because of their very precise nature

Assignment 2
For this assignment, I decided to model and to texture 2 objects: a war hammer and a trash bag. The applications I used are: Maya, Arnold, Substance Painter and Zbrush.
The war hammer:


I created the war hammer in Maya. After modeling, I put color identifiers on each part by adding lambert material and different colors. I created a Low-Poly version of the hammer, which I took into Zbrush to create some details. I subdivided with Remesh to create a High-Poly version, which I used as part of the Baking process.


The trash bag:
I created the trash bag in Zbrush, then I used Substance Painter to texture it. I used smart materials, masks, generators, fill layers, levels. Finally, I took the model into Maya to put the shaders on.


WEEK 12
Surface Modelling- UV Mapping Export
Curve layout for loft
We used a reference image and snaped the start and end of the curve to X=0 in order to have the model mirrored.
We created the profile for surface loft by shaping and duplicating the curve.
With the curves selected: Modeling->Surfaces->Loft to create the loft surface
Curves->Detach to divide the curve at front into 4 separate curves
Surfaces->Boundary to create patch at front

How to convert NURBS to Poly?
Modify->Convert->NURBS to Polygons
Then, Mesh->Combine to combine the separate parts
How to duplicate special?
Modify-> Duplicate special to mirror the model and Geometry Type=Instance, Scale X=-1.0

UV Mapping
We unfolded the model parts by using the Cut and Unfold tool to create UV shells.
We can lay the UV shells out by pressing Orient Shells and Layout.
Finally, we combine the model parts into a single mesh and use Mesh->Mirror, setting to Mirror mesh in +x world axis. The mirrored parts will be shaded red.
Tools->Flip, then Arrannge->Layout to make the shells stay proportional.
Mesh->Smooth (Division levels=2)


Then, we added a lambert material and export the model with the .obj file type. We imported it into Substance Painter and separated the material folders.
WEEK 13
Lighting and Rendering
This week we talked about lighting and rendering. The main reason why it is noise in the Arnold renders is that the sampling is set too low in the render settings.
The guide to remove the noise: https://docs.arnoldrenderer.com/display/A5AFMUG/Removing+Noise
Resolution:
Window->Rendering Editors->Render Settings->Common->Image Size->Presets
We need to turn the render resolution to HD_1080.

WEEK 14
Industry Resources
I found what we did this week very useful as we now know some industry sites such as:
http://www.cgw.com/ for industry news, software release info, interviews, magazine, blogs
http://www.cgchannel.com/
https://beforesandafters.com/
https://area.autodesk.com/
https://cgsociety.org/news/articles?category=News
https://forums.cgsociety.org/
https://www.cgmeetup.com/news?page=1
https://www.youtube.com/channel/UCrSvhrtUgpZT3EU0x1Zoy-w
https://www.youtube.com/channel/UCrSvhrtUgpZT3EU0x1Zoy-w
https://www.awn.com/news/platige-image-releases-koala-unreal-engine-4-powered-short
https://www.animationmagazine.net/
https://s2020.siggraph.org/
Assignment 3
For assignment 3, personal development, I decided to present the techniques I learnt within Maya and Substance Painter this year. Watching a lot of videos on YouTube about modeling and texturing, I picked up some techniques and I combined them with what I was taught at university.
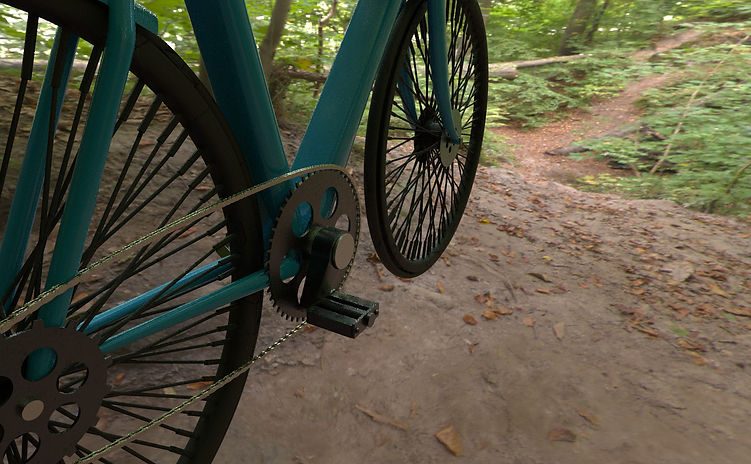
I decided to model a bike in Maya and texture it using Substance Painter. For the model, I used a reference image.


I mainly used cubes, I extruded their faces and manipulated the vertexes. When making the seat, I used a cube, extruded a face, manipulated the vertexes. Using the soft selection tool, I reshaped the seat and made it look more realistic. When making the axes within the wheels, I combined 2 cylinders, I duplicated, rotated them and I used duplicate special to add more. I added a polygon torus above the wheel to make the wheel more detailed.
I made plates for the wheels by using the face of a cylinder, adding 6 cylinders on it and using Mesh->Boolean->Difference
For the handle, I used a cylinder and a torus, set the section radius to 0.200. I deleted the first half of the torus, extruded the edges to expand the ends and then, I controlled the vertexes. I used bridge (25 subdivisions) to connect the cylinder with the torus.
When I made the chain, I used NURBS Primitives-> Circle. I manipulated the vertex of the circle curve, using soft selection. For the chain elements, I modeled and combined some cubes, cylinders and smoothed them. I positioned the first section of the chain on the curve, selected both of them. Then, from the animation tab ->Constrain->Motion Path->Attach to Motion Path. Finally, I created an animation snapshot.


I used Substance Painter for texturing.

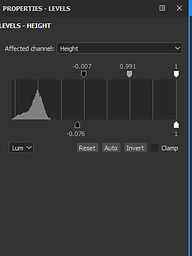





Final Images



bottom of page